
Kitchenthoughts: Pasta Dough – recipe and handeling
And now you think to yourself: “Oh no, why should I make my own pasta? That is just way over the top.” And yes, I also do not eat homemade pasta each week. And then there is the big “BUT”: each time I do take some time to make it, it is just so much better than the stuff you can buy!
And to make it easier on us to enjoy homemade pasta, I have a first post today, about how you prepare and handle pasta dough. In the course of the week another post about forming filled noodles such as ravioli or tortellini will follow, as well as a Swabian version of raviolis.
If the taste-argument just isn’t enough for you:
Here comes my plea for more homemade pasta in your life!
Well, first, the basic recipe for pasta dough is really simple. You just need to mix 3 ingredients together, let the dough rest, roll it out and fill it – that is it. Ok, there are a few things you should observe. But I will tell you about them in the recipe that follows. And still, the dough itself is pretty simple and made quickly.
Second, filling the pasta allows you to be so creative! You can try all possible combinations and taste directions. You are not limited to the choices offered in the super market but instead can let your genius shine. Do you want arugula, goat cheese and olives – why not? Or go crazy with nutella and pineapple – ok, from personal experience I would not recommend this combo. But in my opinion there is nothing better in the kitchen than a simple base recipe, that can be modified over and over again quickly and easily.
And though it may be simple in execution, homemade pasta does have a certain glamour factor to it (number 3). It just looks polished and sophisticated, as if you were a real pro in the kitchen. But, if you know how to make them, the little ones are pretty easy to assemble. All it takes is some time to form them all and voila you’ve got a really impressive meal at your hand.
Which leads me to number 4: even though it does take some time to form them all by yourself, if you ask somebody to help you, you’ve got a really fun kitchen event. If you can chat and laugh while working, it doesn’t seem to take that long (and I here I do not want to point out the options to optimize the process, even though my boyfriend A wants to remind you all that there are multiple possibilities to realize economies of scale here).
And to finish off – number 5: once formed you can freeze the pasta. You only need to take some time once, but can eat fresh, homemade pasta for days. They only take 2 minutes longer in the boiling water then their unfrozen counterpart. So you’ve got a quick and oh so tasty meal at your hand if you’ve got a stack of them (in your big freezer, in your big kitchen…ok, I’m starting to daydream).
Pastadough – the recipe:
Like I just mentioned pasta dough only consists out of three ingredients. My base recipe for 4 portions is:
200 g flour
2 eggs
1/2 tsp salt
A word regarding the ingredients
Regarding the flour I always use the normal wheat flour type 405. And now you might be asking what a “type 405” flour is. Well, in Germany flours are separated in different categories depending on their gluten content and the fineness of grinding. The common “type 405” would translate to American pastry flour. The “German Food Guide” has a very helpful summary of different German flour types here. I use this standard flour because I like the final taste, I always have it on hand and it works well. If you want to use a different variety: inform yourself prior to trying and let me know how it turned out.
The size of the eggs in my opinion doesn’t matter. If they are too small, the dough will not have its desired smooth texture. Then you need to add a tablespoon of water one at a time during kneading. If the eggs are too big, well then the dough will be too tacky and you need a bit more flour. But the recipe is very forgiving regarding small deviations in the relation of the ingredients. So just use the eggs you have at home.
And a word regarding the making of the dough
Add the 200 g of flour and 1/2 teaspoon of salt in a bowl and stir with a fork. Then add the two eggs and puncture the egg yolk with the fork. Now whisk the egg yolk and white together lightly, bevor stirring the egg completely in the flour.
And then it is time to knead and knead and knead. This dough can not be handled very well by a stand mixer, but is best made by hand. After you kneaded the dough for about 5 minutes it should not be crumby or tacky. If it is falling apart into crumbs add a tablespoon of water, knead and if that didn’t help repeat. Is it too tacky add a tablespoon of flour. When the dough sticks together nicely, it is not tacky and you cannot see any individual crumbs on its surface (ergo, it has a smooth, integrated surface), then you may stop kneading.
Now let it rest for 30 minutes in the bowl. Why? Well, “activate teachers voice”: during the kneading you activated the gluten in the dough (which means you introduced more energy through motion and body heat). The gluten is sort of a glue in your dough, that makes sure everything stays together. In order to do that it forms long chains. But the connections of the chains are still weak and developing right after you stopped kneading. And that is why it needs some time to rest and strengthen the connections. Or in other words: you just worked the dough really hard and now it needs to regenerate before it can continue with the next round.
Cover your bowl with a damp (damp, not dripping wet) paper towel or a clean, damp kitchen towel. The moisture prevents the surface of the dough from drying up and it will be easier to handle later on.
How to handle the dough
After the 30 minutes of resting time flour your work surface. You can now roll out your dough in two rounds. So first separate it into two portions with a knife (please, do not pull it apart, the gluten connections do not like that). Let one half continue resting under your damp towel in the bowl and work with the other half.
To roll out the dough you can either use a pasta machine or your trusted rolling pin. The advantage of a pasta machine is that the dough can be turned into thinner sheets with less strength needed. But I personally like the dough to be a bit thicker if I am filling my pasta and am quicker when using a rolling pin.
If you are using a pasta machine, let the dough run through a few times in the widest setting. For smooth sheets it is helpful to continuously pull the sheet to the side gently. After it went through put it on your floured work surface. Is the dough too dry (and thus falling apart) brush it with a bit of water. Is the dough too sticky (and thus falling apart) dust it with flour. Then fold the right third in the middle and fold the left third over the middle as well. Push it down gently and roll through the machine with the open side down. If your sheet reaches the consistency of the last picture below, you can set the machine one step smaller.
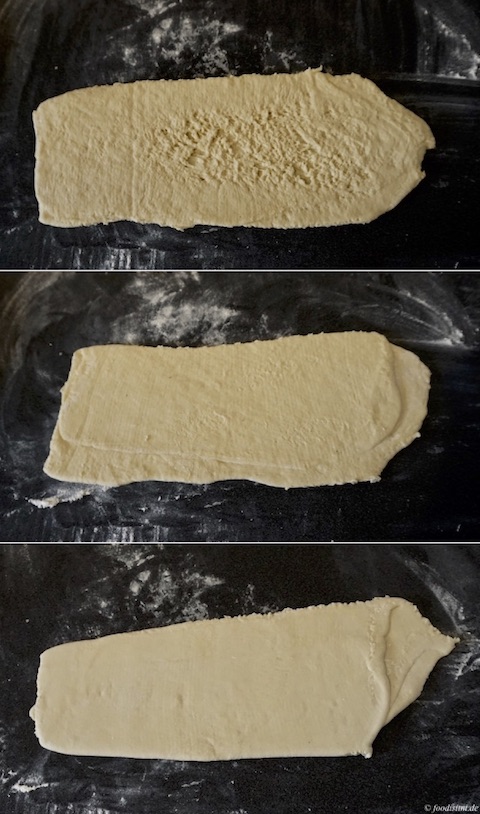
Fold your dough after each run through as just described and let it run through the machine with one open side facing down. As soon as the sheet becomes too long to handle comfortably, just cut it in half and work with each sheet separately.
If you are using your rolling pin, make sure to turn the sheet regularly and to dust it with flour (to make sure it doesn’t stick to the surface). Here you need a bit more strength to get the sheets very thin – but if your pasta machine is almost breaking apart like mine and thus really awkward to handle, this way is preferable by me.
And what shall I do now with the sheets of dough?
Well, tomorrow I will post something about how to form filled pasta – because these in my opinion beat plain Spagetti.
And in the course of the week three recipe for my favorite pasta variations will follow:
Tortellini with a filling made out of dried tomato, pumpkin seeds and cream cheese (Recipe)
Ravioli with beet root, feta and walnuts (Recipe) and
Maultaschen – a German classic recipe (Recipe).
I hope I could convince you to just give homemade pasta production a chance and I wish you a blast trying it out!